
Spreadsheet with a 2-D dataset
[Index] [1] [2] [3] [4] [5] [6] [7]
HDFView displays datasets in a two-dimensional table, the TableView. The TableView allows you to view and change the values of an image's dataset. You can select rows and columns and plot the row/cloumn data in a line plot. The current version of HDFView does not allow you to change data values of an HDF4 Vdata or an HDF5 compound dataset.
If a dataset has three or more dimensions you can only view two dimensions at a time. Using the Dataset Selection Dialog , you may select any two dimensions of the dataset to display and a third dimension to flip the two-dimension table along that dimension.
To open the entire contents of a dataset, double-click on the dataset or select the dataset, then choose the "Open" command from the Object menu or popup menu. A new spreadsheet is created in the content panel of HDFView.
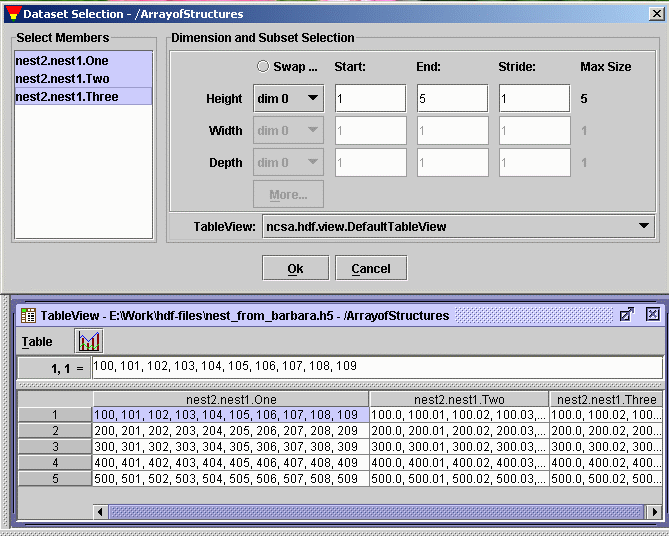
HDFView displays numerical datasets in a "spreadsheet", which shows the data values in a grid. A one-dimensional dataset is displayed as a single column and a number of rows of dimension size. A two-dimensional dataset is displayed as a number of columns of the first dimension size and a number of rows of the second dimension size, i.e. dim[0]=height and dim[1]=width by default. You can change the order of the dimensions using the "Open As" command.
Spreadsheet with a 2-D dataset
Opening an entire large dataset may cause an 'Out Of Memory Error' because the Java Virtual Machine cannot create the required objects. HDFView provides options to select a subset of a dataset for display. You can also select dimensions and the order of dimensions to display, e.g., to switch the columns and rows.
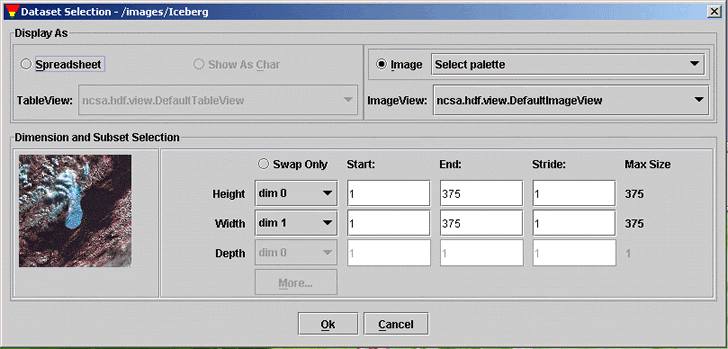
To make a selection, select a dataset from the tree and choose the "Open As" command from the Object menu or the popup menu. The selection dialog box appears. You can make a selection by dragging the mouse on the preview image or entering the values of start, end, and stride. The figure below shows that a subset is selected from a true color image with the size of 3796 x 3720.
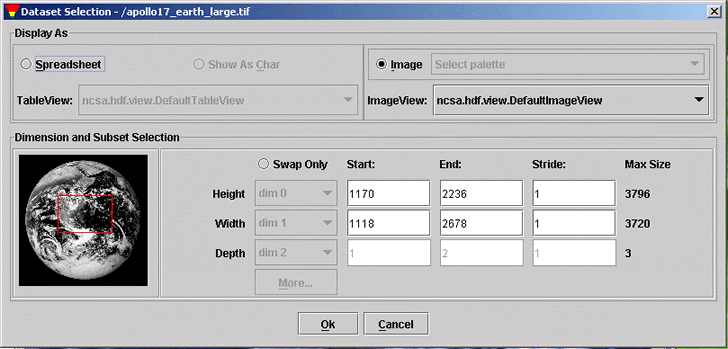
Selection of Dataset.
By default, a scalar dataset (e.g., a dataset or SDS of numbers) is displayed in a spreadsheet. You can also display a dataset as an image. To display a dataset as an image, click the Image radio button in the Dataset Selection dialog box and select a predefined color table for the dataset. This operation takes the data values of the dataset as values of an indexed array, i.e., as indexes into a palette. The default palette will be used to create the image from the dataset if it does not have an attached palette. If the data values are not integers or have a range outside 0 to 255: they are binned into 256 equally spaced intervals.
A subset is determined by the start and end locations, and the stride. The "Start" array determines the starting coordinates of the subset to select. The "End" array determines the ending coordinates of the subset to select. The "Stride" array chooses array locations from the dataspace with each value in the stride array determining how many elements to move in each dimension. Setting a value in the stride array to 1 moves to each element in that dimension of the dataspace; setting a value of 2 in a location in the stride array moves to every other element in that dimension of the dataspace. In other words, the stride determines the number of elements to move from the start location in each dimension.
HDFView GUI uses a common-sense indexing scheme for selecting rows and columns. If the user wants a subset that begins at i,j the START coordinates will start at j, j instead of i-1, j-1.
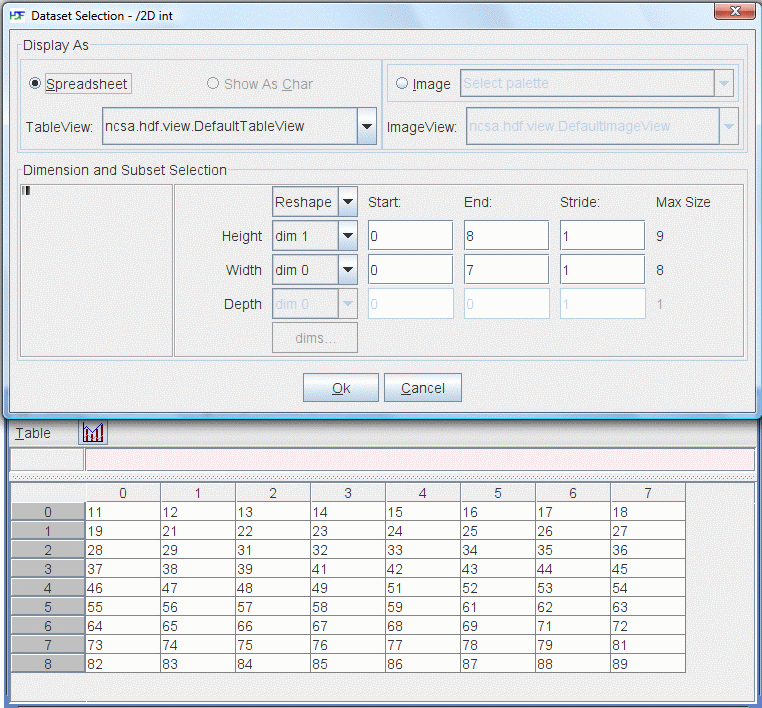
The following is an example of a 2-D integer dataset of size 8 X 9.
| 11 | 12 | 13 | 14 | 15 | 16 | 17 | 18 | 19 |
| 21 | 22 | 23 | 24 | 25 | 26 | 27 | 28 | 29 |
| 31 | 32 | 33 | 34 | 35 | 36 | 37 | 38 | 39 |
| 41 | 42 | 43 | 44 | 45 | 46 | 47 | 48 | 49 |
| 51 | 52 | 53 | 54 | 55 | 56 | 57 | 58 | 59 |
| 61 | 62 | 63 | 64 | 65 | 66 | 67 | 68 | 69 |
| 71 | 72 | 73 | 74 | 75 | 76 | 77 | 78 | 79 |
| 81 | 82 | 83 | 84 | 85 | 86 | 87 | 88 | 89 |
The following are a few examples of subsets of the 2-D int array.

The whole dataset -- start=(0, 0), end=(7, 8) and stride=(1, 1)
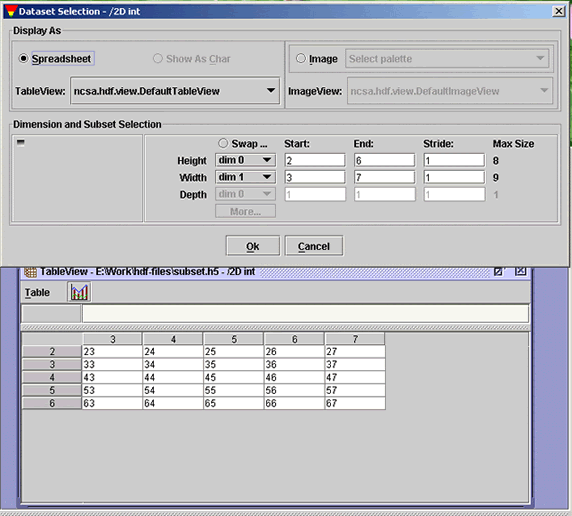
Subset -- start=(2, 3), end=(6, 7) and stride=(1, 1)
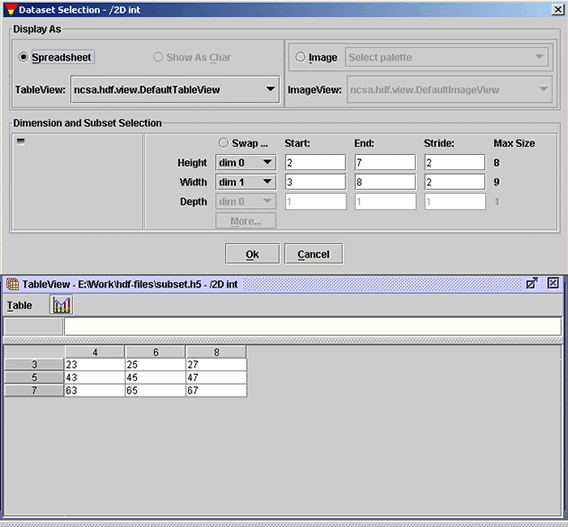
Subset with stride -- start=(2, 3), end=(7, 8) and stride=(2, 2)
For a three or more dimensional dataset, the first two dimensions are displayed as a 2-D spreadsheet, and the third dimension is chosen as the page number of the 2-D spreadsheet, i.e. dim[0]=height, dim[1]=width and dim[2]=depth by default. Using the "Open As" option to change the default order of dimensions, the user can flip the page forward or backward to look at the 2D data values at different positions along the third dimension. The current page number is displayed in the status bar of the HDFView.
To flip a data sheet of a 3-D dataset, use the "First", "Previous", "Next" or "Last" command on the tool bar.
The following figure shows how a 5-D integer dataset of size 10 x 20 x 30 x 40 x 50 is displayed. The data is displayed in a spreadsheet of 40 X 50 (dim3 by dim4), of page 2 (dim2), cutting locations 2 at dim0 and 3 at dim1.
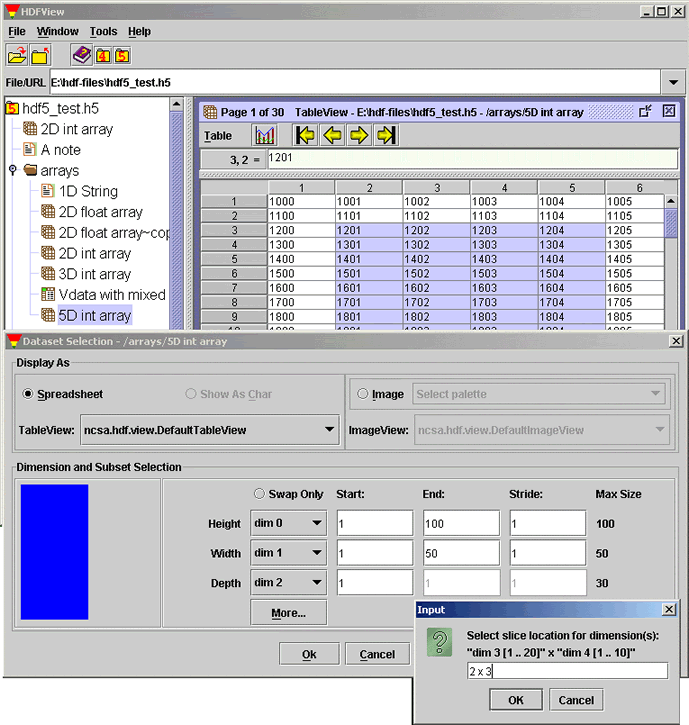
Spreadsheet with 3-D dataset [Comment: Is this 3-D or 5-D?]
By default, HDFView chooses the first coordinate, dim[0], as the ROW index and the second coordinate, dim[1], as the COLUMN index. For example, a 2-D dataset of 8 X 9 (dim0=8, dim1=9) is displayed as eight rows and nine columns by default.
You can also swap the dimension order. However, swapping the dimension order does not change the data order. To change the data order, use the "Transpose" option. Swapping and transposing only apply to the data in the display and not to the data in the file.
Let us use the previous example to demonstrate this procedure.
| 11 | 12 | 13 | 14 | 15 | 16 | 17 | 18 | 19 |
| 21 | 22 | 23 | 24 | 25 | 26 | 27 | 28 | 29 |
| 31 | 32 | 33 | 34 | 35 | 36 | 37 | 38 | 39 |
| 41 | 42 | 43 | 44 | 45 | 46 | 47 | 48 | 49 |
| 51 | 52 | 53 | 54 | 55 | 56 | 57 | 58 | 59 |
| 61 | 62 | 63 | 64 | 65 | 66 | 67 | 68 | 69 |
| 71 | 72 | 73 | 74 | 75 | 76 | 77 | 78 | 79 |
| 81 | 82 | 83 | 84 | 85 | 86 | 87 | 88 | 89 |
By default, the dataset is displayed at eight rows and nine columns.
Default dimension order -- row index = dim[0], column index = dim[1]
Swap row and column dimensions to display the dataset as nine rows and eight columns. The order of data stays the same (counting from the location [0, 0], [0, 1], ... [2, 0], [2, 1], ...).
Swap row/column dimensions -- row index = dim[1], column index = dim[0]
In some cases, we also want to transpose the data (changing the data order) when we swap the row and column dimensions. To transpose the data, select the "Transpose" option from the drop-down menu. For example, transpose the data to display the dataset as nine rows and eight columns. The order of the data is also changed
![]()
Transpose data -- row index = dim[1], column index = dim[0]
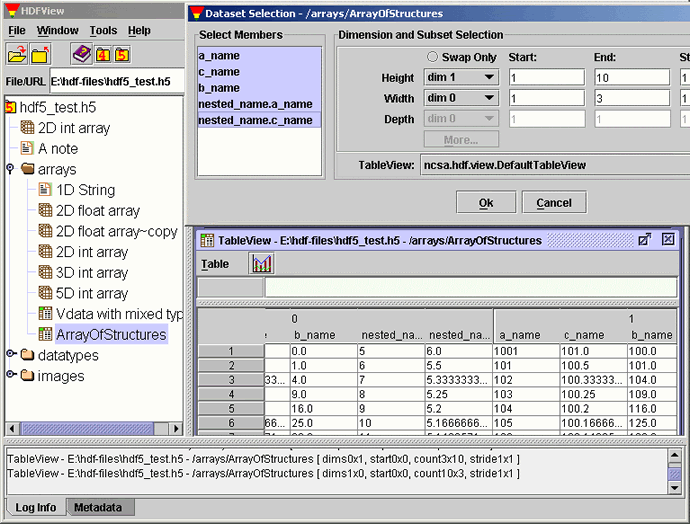
HDFView displays HDF4 Vdata and a simple, one-dimension HDF5 compound dataset (without a nested compound) as a 2-D table with rows as records and columns as fields/members.
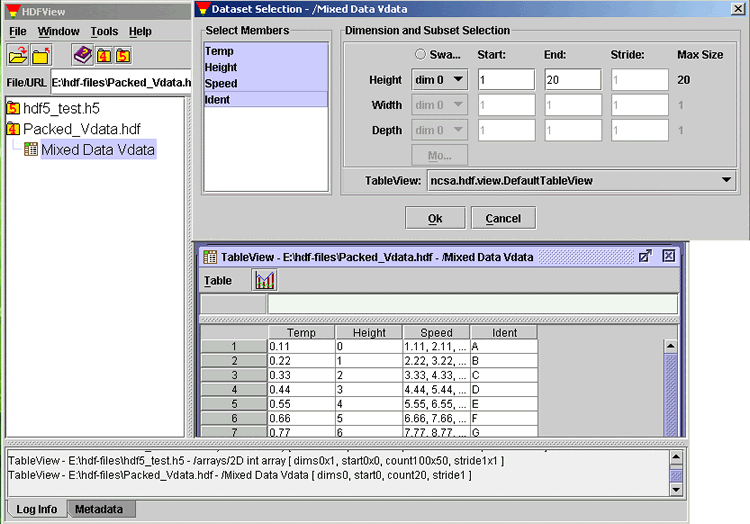
Compound Dataset
You can also select fields/members to display. For a contiguous selection, hold down the "Shift" key while clicking the first and last fields/members of your selection. For a discontiguous selection, hold down the "Ctrl" key while clicking the fileds/members that you want to select.
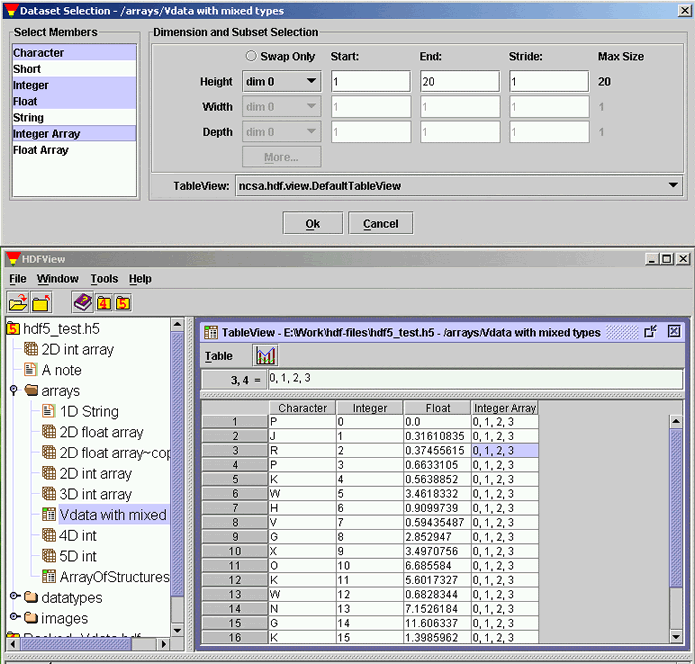
Field/Member Selection of Compound Dataset
HDFView displays a nested HDF5 compound dataset as a flat list of members. The nested names are separated by "." (a period). For example, if a compound dataset "A" has the following nested structure:
    A --> m01
    A --> m02
    A --> nest1 --> m11
    A --> nest1 --> m12
    A --> nest1 --> nest2 --> m21
    A --> nest1 --> nest2 --> m22
    i.e.
    A = { m01, m02, nest1{m11, m12, nest2{ m21, m22}}}
The flat list of members of the compound dataset "A" will be {m01, m02, nest1.m11, nest1.m12, nest1.nest2.m21, nest1.nest2.m22}.
Nested Compound Dataset
HDFView displays multi-dimension compound datasets as a 2-D table with nested sub-columns. The members are shown in the sub-columns.
2-D Compound Dataset
Column or row data of numerical values can be displayed in a simple line
plot. Select rows or columns by dragging the mouse on the rows or columns that you want to plot;
then click the chart icon: ![]() The row or column data is plotted against a column or row index, respectively.[Comment: Do you mean respectively or sonversely? You say "row or column data ... against ...column or row index".] HDFView displays up to 10 rows or columns at a time.
The row or column data is plotted against a column or row index, respectively.[Comment: Do you mean respectively or sonversely? You say "row or column data ... against ...column or row index".] HDFView displays up to 10 rows or columns at a time.
The following figure shows that data of five columns are displayed in five lines of different colors. The horizontal labels are the row index of the 100 data points. The vertical labels are the ten points of equal data range with the maximum and minimum of the column data. The line legend is drawn at the right of the line plot with column names and line colors.
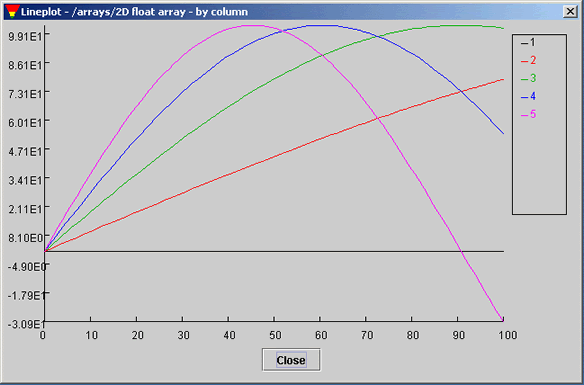
Line Plot
You can change the values of a dataset in two ways: type data into the table cell or paste data from the system clipboard. HDFView rejects invalid data values. For example, it does not accept a floating point number into an integer dataset. Table 5.1 lists the rules for entering data. Any changes of data values only exist in memory. They are not saved to file until you choose "Update File" from the Object menu, or, when you dismiss the table, you will be asked if you want to save the change to the file.
| Data type | Acceptable formats |
|---|---|
| byte | -127 to 128 |
| short | -32768 to 32767 |
| int | -2147483648 to 2147483647 |
| float, double | Numbers of the form "99.9" or "8", and "-9.9" or "-9", and ".9" or "-.9" Numeric overflow or underflow will be detected. |
| string | A string longer than the stored value will be silently truncated when written to the file. |
| unsigned byte | 0 to 255 |
| unsigned short | 0 to 65535 |
| unsigned int | 0 to 4294967295 |
Data values can be copied with "Copy" and "Paste". Data can be copied within a spreadsheet or between two spreadsheets. To copy data, select the data cells to copy, then choose the "Copy Data" command from the "Object" menu. Then select the cells to paste into and select the "Paste Data" command from the "Object" menu.
You can also copy and paste between HDFView and other applications. To copy external data from other application such as a text editor or MS Spreadsheet[Comment: Do you mean Microsoft Excel?], select and copy data from the application, then paste the data into the HDFView TableView, and vice versa.
You can also change values by using predefined math functions. To change table values, select the data area and choose the "Math conversion" command from the "Table" menu. A list of predefined mathematic functions are provided. Select a function and enter the function parameters. The values of the selected data cells will be changed based on the mathematic function.
Writing table data into an ASCII file is nearly transparent. Select "Save As Text" from the "Object" menu, and the Save Current Data to Text File dialog box pops up for you to enter the name of the file. The data values of the current table will be written to the file. The data values are separated by the data delimiter specified by the user options. The text file does not contain any datatype and dataspace information. HDFView cannot read back the text file.
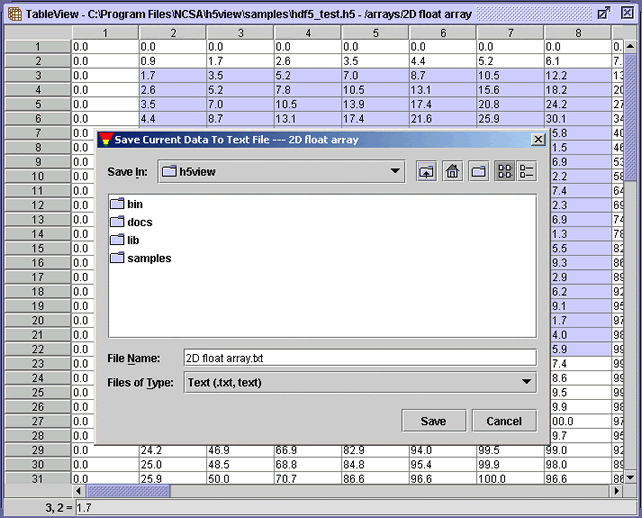
Save Current Data to Text File
You can fill the table cells directly from a text file. Choose the "Import Data From Text File" command from the "Table" menu and select the text file to import. The data values must be separated by a space or the delimiter specified in the "User Options". The cells of the table are filled row by row starting with the selected cell. The line breaks in the text file are not important. For example,
10 11 12 13 14 15
16 17 18 19 20 21
and
10 11 12 13
14 15 16 17
18 19
20 21
are the same.
[Index] [1] [2] [3] [4] [5] [6] [7]